Angular Basic Bindings

Introduction
The following is the beginning of a series I'm planning on creating around what I've been learning in Angular. As a previous AngularJS developer, I thought I'd re-spark my web development joy with diving back into Angular learning what's new. And boy, is there is a lot that's new. With 18 versions since Angular's introduction, there should be plenty to learn.
Angular
If you weren't aware of what Angular is, it is a TypeScript (Javascript) framework that allows a developer to create dynamic websites using components and templates. It has a full suite of tools that aid your development process and a set of libraries that allow you extend the capabilities and features easily. Its based on TypeScript, a superset language of Javascript.
Binding Techniques
Today we are going to talk about the various binding techniques in any angular project. When you develop an Angular component, there are several files that are created that are linked with one another for that component. A Typescript file, an HTML template file, and an optional styles file (CSS, SaaS, etc). In the example project we use in this article, we have the following three files. These three files are the default "app" component files that are built when using the Angular CLI tool to create a new project.
src\app.component.ts
src\app.component.html
src\app.component.css
In order for Angular to dynamically update data in your template, it links specific data in the template (app.component.html) to properties in your Typescript file (app.component.ts), specifically within the Typescript class for that component. We will dive into these binding techniques in this article.
String Interpolation
The first binding technique is known as string interpolation. With string interpolation, a javascript string object is dynamically inserted directly within the template between a set of curly braces, like so {{ "string" }}. In fact, this set of curly braces is directly linked with the TypeScript component class AppComponent, and so any valid Javascript or Typescript can be run within these curly braces. So for example, if you wanted to call a function from your "AppComponent" class within these curly braces, you could do that, just so long as it returns a string. We will talk more about binding functions later.
Here in this picture you can see an example of how string interpolation connects a variable in your Typescript file to your template.

Property Binding
The second binding technique is known as property or attribute binding. With property binding one can dynamically control your HTML element attributes. For examples, one can dynamically change the hidden status of an element, add a dynamic style through the class attribute, or modify any other HTML attribute on an element. We indicate property binding by wrapping our attributes in a pair of square brackets, []. This indicates to Angular that the value of this attribute will be bound to the Typescript class and can be controlled by Angular. Such a binding looks like this:
<h1 [hidden]="isHidden"> Hello {{name}}!</h1>
Notice the square brackets around the hidden attribute. The value of the hidden attribute here "isHidden" is actually referring to a boolean value in our Typescript file. When the value of isHidden is true, the hidden property on the h1 tag will be active and the element will be hidden by the DOM. When isHidden is false, the h1 tag will be shown.
export class AppComponent {
  title = 'example-project';
  name = 'World';
  isHidden = false;
...
Here we can see an example of the property binding and its connection between the typescript and HTML template files.

Event Binding
Finally, the third binding technique we will discuss today is event binding. Event binding, as you could guess, allows you to bind Typescript to events on HTML elements in your template. So for instance, one could bind a typescript function to be run when a button is clicked, or, when a paragraph is mouseover'd. The special characters used for event binding is the open and close parentheses, (). These are wrapped around an action keyword, such as "click", the result of which looks like this:
<button
(click)="toggleVisibility()" >
{{isHidden ? "Show": "Hide"}}
</button>
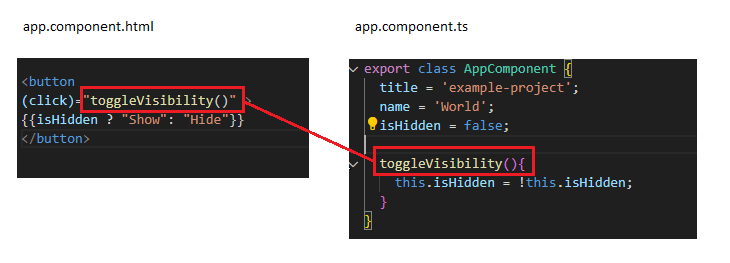
Remember that "isHidden" property from before, well here we see it pop up again. This time its being used to not only control the visibility of the h1 tag, but also it is used with string interpolation to dynamically change the name of the button.
And here is a picture that shows how the toggleVisibility() function is tied to the template and the typescript.

Wrap Up
In this article we learned about three types of bindings that can be used in an Angular project, String Interpolation, Property Binding, and Event Binding. I hope this article was helpful and I look forward to bring you more interesting topics in Angular soon.


