Web API on Cloudflare

Bakery API
In previous articles, I showed you how Cloudflare can help you build a static site using its Workers compute feature. We also went over how they can protect your site with many of their built-in security features. In this article, we are going to go a little deeper in the Workers ecosystem that Cloudflare has built on their platform. Within this ecosystem we can find many serverless compute features available to developers as well as data storage and even Artificial Intelligence (AI) models.
To get our feet wet into this ecosystem, I decided to follow their various tutorials and documentation to build an API for our Cake Jello Bakery. This API will have some basic CRUD functions to create/update/delete/list cake recipes, as well as, send a recipe to "bake" in our oven using a text-to-image AI model.
Ingredients
Under the hood of this site we are going use some various Cloudflare tools.
- Cloudflare Wrangler - developer client side tools for interacting with Cloudflare's various services.
- Basic OpenAPI app template - an OpenAPI compliant API app built on javascript libraries Hono and Chanfana.
- Cloudflare D1 database - a serverless SQLite database in Cloudflare's network
- Cloudflare Workers AI - AI models you can call and run from Cloudflare. Specifically we are using the "stable-diffusion-xl-lightning" text-to-image model.
Project Files
https://github.com/randclem/bakery-api
Build - Getting Started
Wrangler
We will need to download and install Wrangler to get started. Cloudflare has docs on that here: https://developers.cloudflare.com/workers/wrangler/install-and-update/
To initialize our application we run npx wrangler init which will guide us through a series of prompts to build the API app from a template. It will ask us a series of questions like what do we want to name our app directory, what type of template do we want, do we want to use use git, etc. For this application I chose the API start (OpenAPI compliant) template.
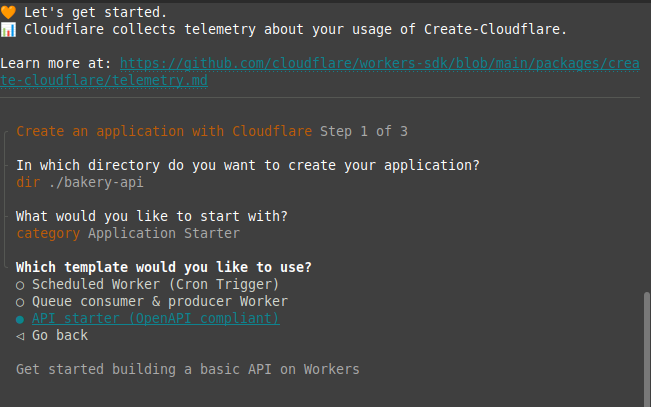
Of course I also chose to setup a new git repository but declined to deploy the application right now. We'll get to that later, of course.
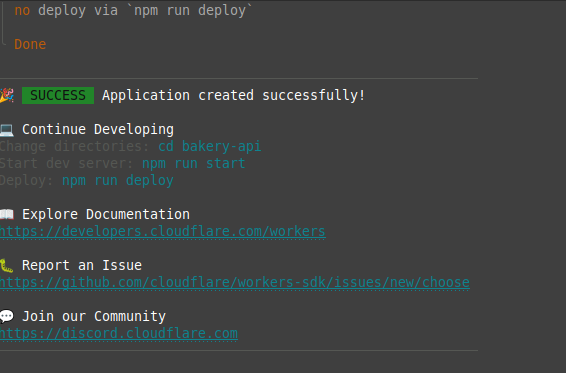
And just like that we are ready!
Code
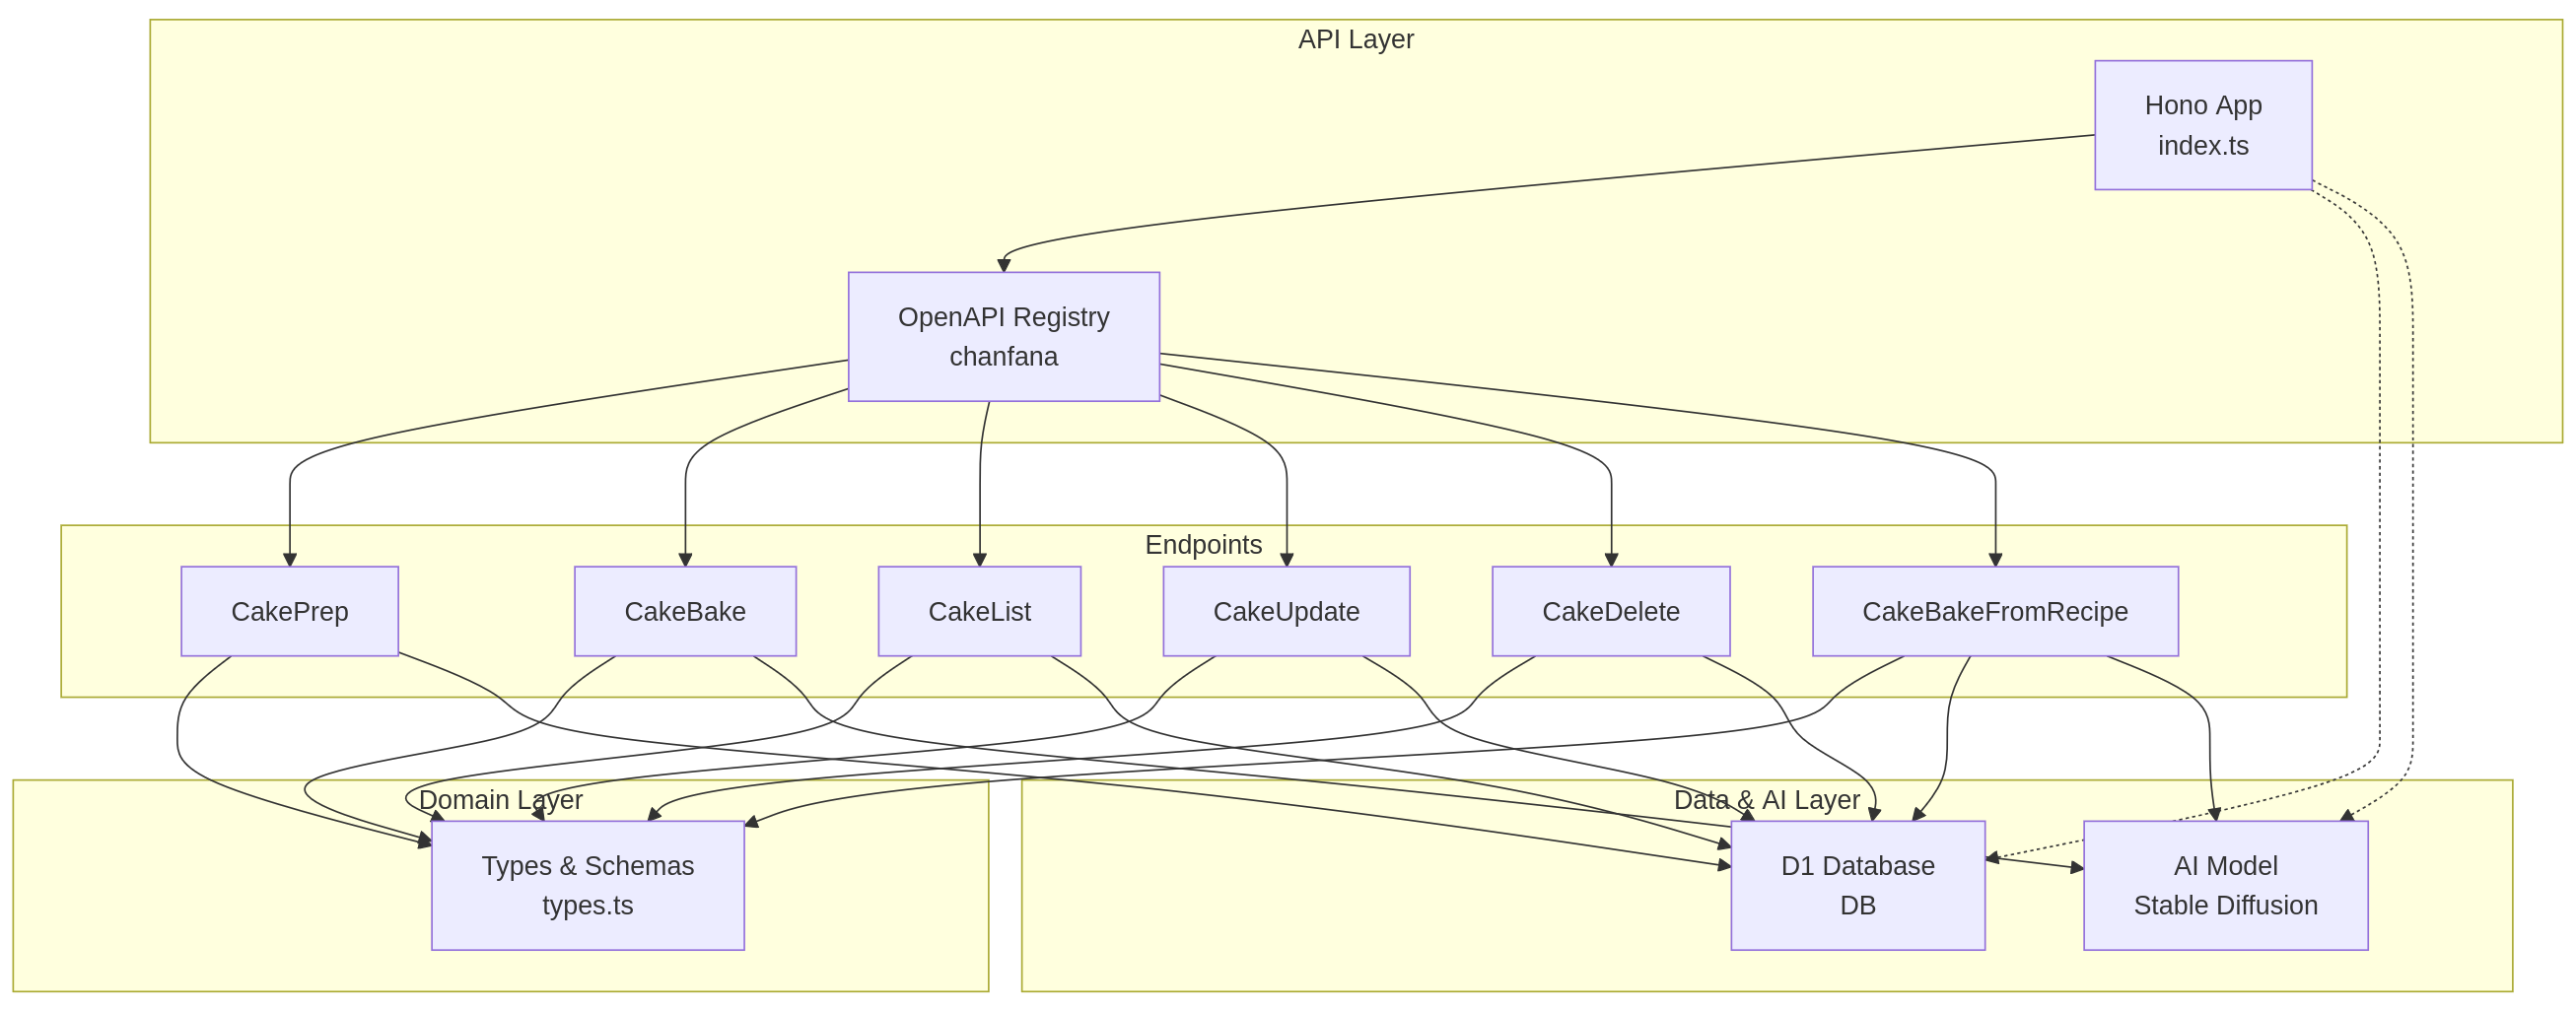
Architecture
The API is designed in several layers. The main API layer is our entrypoint and where the index.js creates a Hono app using OpenAPI libraries. The API endpoints layer includes the various classes and methods which interact with the DB and AI layer. And finally the typescript typing is controlled in the domain layer providing schemas for the some of the objects in the system.
After replacing the initial boilerplate files our project directory looks like the following.
.
├── node_modules
    (omitted all the node packages)
── package.json
├── package-lock.json
├── README.md
├── src
│   ├── endpoints
│   │   ├── cakeBake.ts
│   │   ├── cakeBakeRecipe.ts
│   │   ├── cakeDelete.ts
│   │   ├── cakeList.ts
|   |   ├── cakePrep.ts
│   │   └── cakeUpdate.ts
│   ├── index.ts
│   └── types.ts
├── tsconfig.json
├── worker-configuration.d.ts
└── wrangler.jsonc
Config Files
Lets talk about some of the configuration files that are part of this project first and then we'll begin to dive into the code. The initial build has a directory structure that includes a few important configuration files, node modules, and of course our project source built in typescript.
The following three files are typical in most Cloudflare worker wrangler projects.
- tsconfig.json - This is the typescript configuration file. In some types of Cloudflare projects you may want to modify some of the options in here. I did not mess around with this and left everything at defaults. More information on this file: https://developers.cloudflare.com/pages/functions/typescript/
- worker-configuration.d.ts - This is a file that is auto-generated by the
npx wrangler typescommand. It contains many of the typescript types that will be needed by your project. - wrangler.jsonc - The Wrangler config file. This is where you will add configuration details that will connect Cloudflare resources, like Workers AI and D1 Database, to your app. Further reference: https://developers.cloudflare.com/workers/wrangler/configuration/
Logic
index.ts
The entrypoint for our application. Inside index.ts we start by building a Hono app. The Hono app will import Bindings that are setup in the wrangler.jsonc file. This provides an object to access Cloudflare features and services such as the D1 database and AI models.
const app = new Hono<{ Bindings: Env }>();
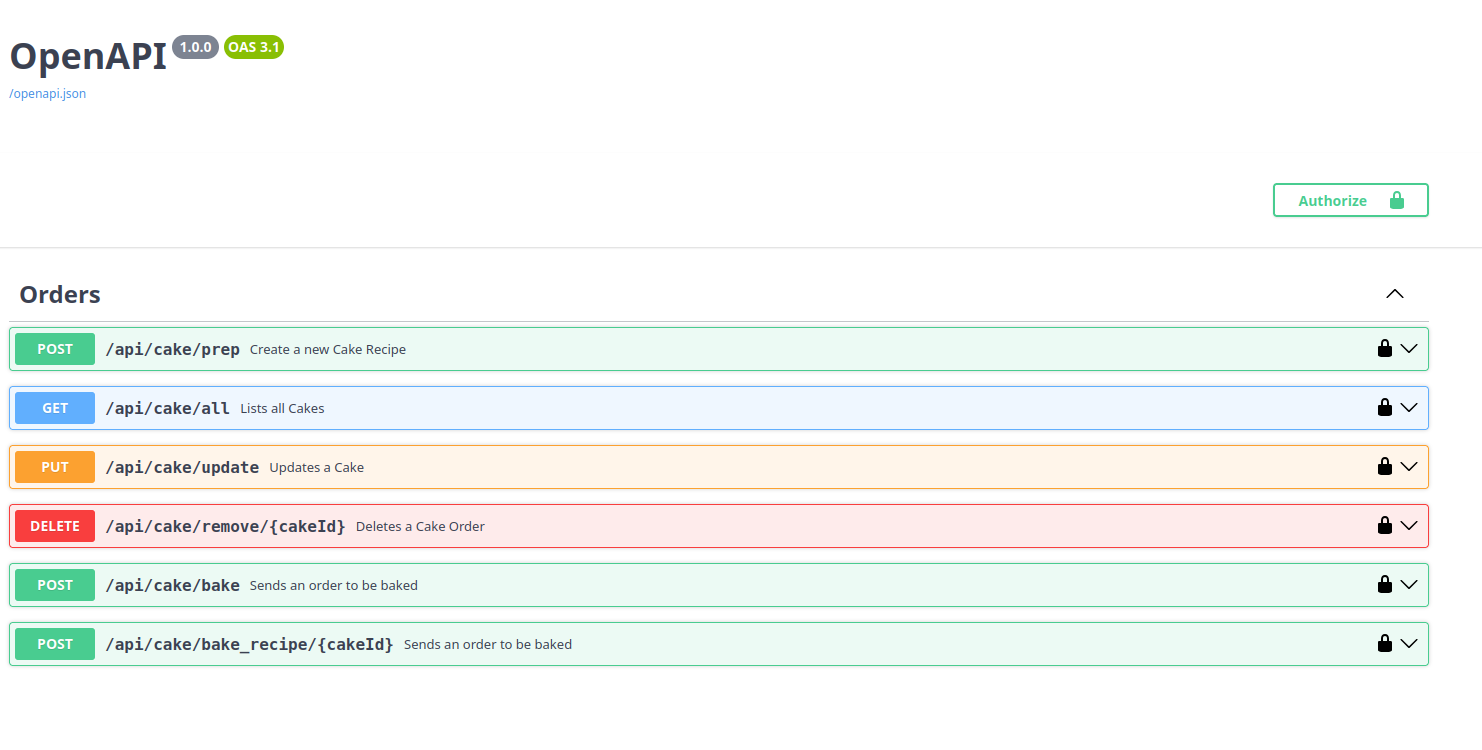
Next, we begin the setup of the OpenAPI registry and then register our endpoints and their associated classes for handling requests. Endpoints are appended to the website address, for example: "http://example.com/api/cake/prep".
// Setup OpenAPI registry
const openapi = fromHono(app, {
	docs_url: "/",
});

// Register OpenAPI endpoints
openapi.post("/api/cake/prep", CakePrep);
openapi.get("/api/cake/all", CakeList);
openapi.put("/api/cake/update", CakeUpdate);
openapi.delete("/api/cake/remove/:cakeId", CakeDelete);
openapi.post("/api/cake/bake", CakeBake);
openapi.post("/api/cake/bake_recipe/:cakeId", CakeBakeFromRecipe);
Finally we export the default app and provide our application entrypoint.
// Export the Hono app
export default app;
types.ts
Out of the box, the types.ts file provides some boilerplate types that go with the base project's classes. These can be removed or updated to your liking as you develop your app. For instance, some of my customizations for this project include the CakeOrder object and some modifications to that design (CakeOrderInput, CakeOrderUpdate).
export const CakeOrder = z.object({
	name: Str({ example: "cake_order", required: true}),
	description: Str({ required: true}),
	state: z.enum(["New", "InProgress", "Completed"]),
	orderNum: number(),
})
types.ts is also a good place to include the customized type for the Env class. If you remember from index.ts when we initialized the Bindings we instantiated them on the Env class. Here we can define the type for that class that will expose the D1 database and AI objects to the rest of our application classes.
type Env = {
	DB: D1Database;
	AI: Ai;
}
The AppContext type is used to expose the Hono application context to the classes in our application. In Hono, this is how you access the environment properties and Cloudflare resources in your application. Keep that in mind as you read some of the Cloudflare documentation for their workers, as some of the examples do not use Hono and AppContext, and simply pass in a basic e: env property instead.
export type AppContext = Context<{ Bindings: Env }>;
wrangler.jsonc
Add the bindings for the Cloudflare resources to the end of this file to enable them.
    "ai": {
       "binding": "AI"
    },

    "d1_databases": [
    {
      "binding": "DB",
      "database_name": "bakery-api-d1",
      "database_id": "data-base-guid-xxx-xxxxx"
      }
    ]
Once those are added to the file, run npx wrangler types to update the worker-configuration.d.ts file. This will auto-generate the necessary types and interfaces for usage by the app.
// Runtime types generated with [email protected] 2025-06-20
declare namespace Cloudflare {
    interface Env {
    API_KEY: string;
        DB: D1Database;
        AI: Ai;
    }
}
interface Env extends Cloudflare.Env {}
Endpoints
Each of the endpoints are class definitions that extend the OpenAPIRoute class from 'Chanfana' library.
OpenAPIRoute requires a couple of things to operate.
- the
schemaproperty - defines the schema of requests and responses and provides some descriptions and metadata for the API endpoint. Not only is this used to build your OpenAPI definition and index page, it also is used to validate requests for the correct schema. - the
async handlemethod - this is the handler for the request and where you place your business logic. It can take an array of typed parameters. Most common is to pass in the AppContext for availability. This is where we will use that type we defined before for AppContext
To access the data passed into your request use this fancy string:
const data = await this.getValidatedData<typeof this.schema>();
This provides you the data from the body in the shape of your type you defined in the request schema. This is how we use the schema to validate requests.
cakePrep.ts
This endpoint is used to begin a recipe for a cake and save it to the database. It's schema accepts a request that includes body content that is shaped based on the schema of CakeOrderInput type object we defined earlier.
schema = {
  tags: ["Orders"],
    summary: "Create a new Cake Recipe",
      request: {
        body: {
          content: {
            "application/json": {
              schema: CakeOrderInput,
              },
            },
          },
        },
The CakeOrderInput object defines a json object in typescript code that follows this schema.
{
  name: Str({ example: "cake_order", required: true}),
  description: Str({ required: true}),
}
So for example we would need to pass in the body a json object that would like this:
{
  name: "My cake order name string",
  description: "The description of my order"
}
We can also define the responses we expect back after processing. Here we define the shape of the json object in the content that a 200 OK response would provide us. We can define schemas for many different types of responses such as 401 forbidden, 500 server error, etc.
responses: {
    "200": {
        description: "Returns the prepped Recipe",
            content: {
            "application/json": {
                schema: z.object({
                    series: z.object({
                        success: Bool(),
                            result: z.object({
                            order: CakeOrder,
                                }),
Finally the handle method in our cakePrep endpoint accepts and validates the data from the request body and then calls the database with a prepared statement. All of this is done in a try/catch to handle any errors and gracefully fail. Also here we can see how the AppContext which had our Cloudflare service bindings attached to it is being used to call the D1 database. c.env.DB.prepare(query) for example.
async handle(c: AppContext) {
    // Retrieve the validated request body
      try {
        // Get validated data
        const data = await this.getValidatedData<typeof this.schema>();
        let query = 'INSERT INTO cakes (name, description, state) VALUES (?, ?, ?)';
        let stmt = c.env.DB.prepare(query);
        if (data) {
          stmt = stmt.bind(data.body.name, data.body.description, "New")
        }

        const result = await stmt.run();

        return c.json(result);
        } catch (err) {
          return c.json({ error: `Failed to run query: ${err}`}, 500);
        }
    }
Other CRUD endpoints
The other CRUD endpoints in this app use a similar pattern to cakePrep.ts in terms of their logic.
- Define a schema for request and responses
- Define your handle method and pass in the AppContext
- Use prepared database statements to create, read, update, or delete (CRUD) your data. Fail gracefully with try/catch.
The other endpoints:
cakeUpdate.ts - Updates a recipe
cakeDelete.ts - Deletes a recipe
cakeList.ts - Lists all recipes
Baking a Cake
The only other endpoint I wanted to talk about in this article would be the cakeBake endpoint and its sister endpoint cakeBakeFromRecipe. Each of these use AI model to "bake our cake" and respond with a cake jello image based on the supplied description. The only difference between the two is that cakeBake accepts an ad-hoc name and description for the cake in its request, and, cakeBakeFromRecipe takes a recipe Id to call a stored recipe from the database and bake it with the AI model.
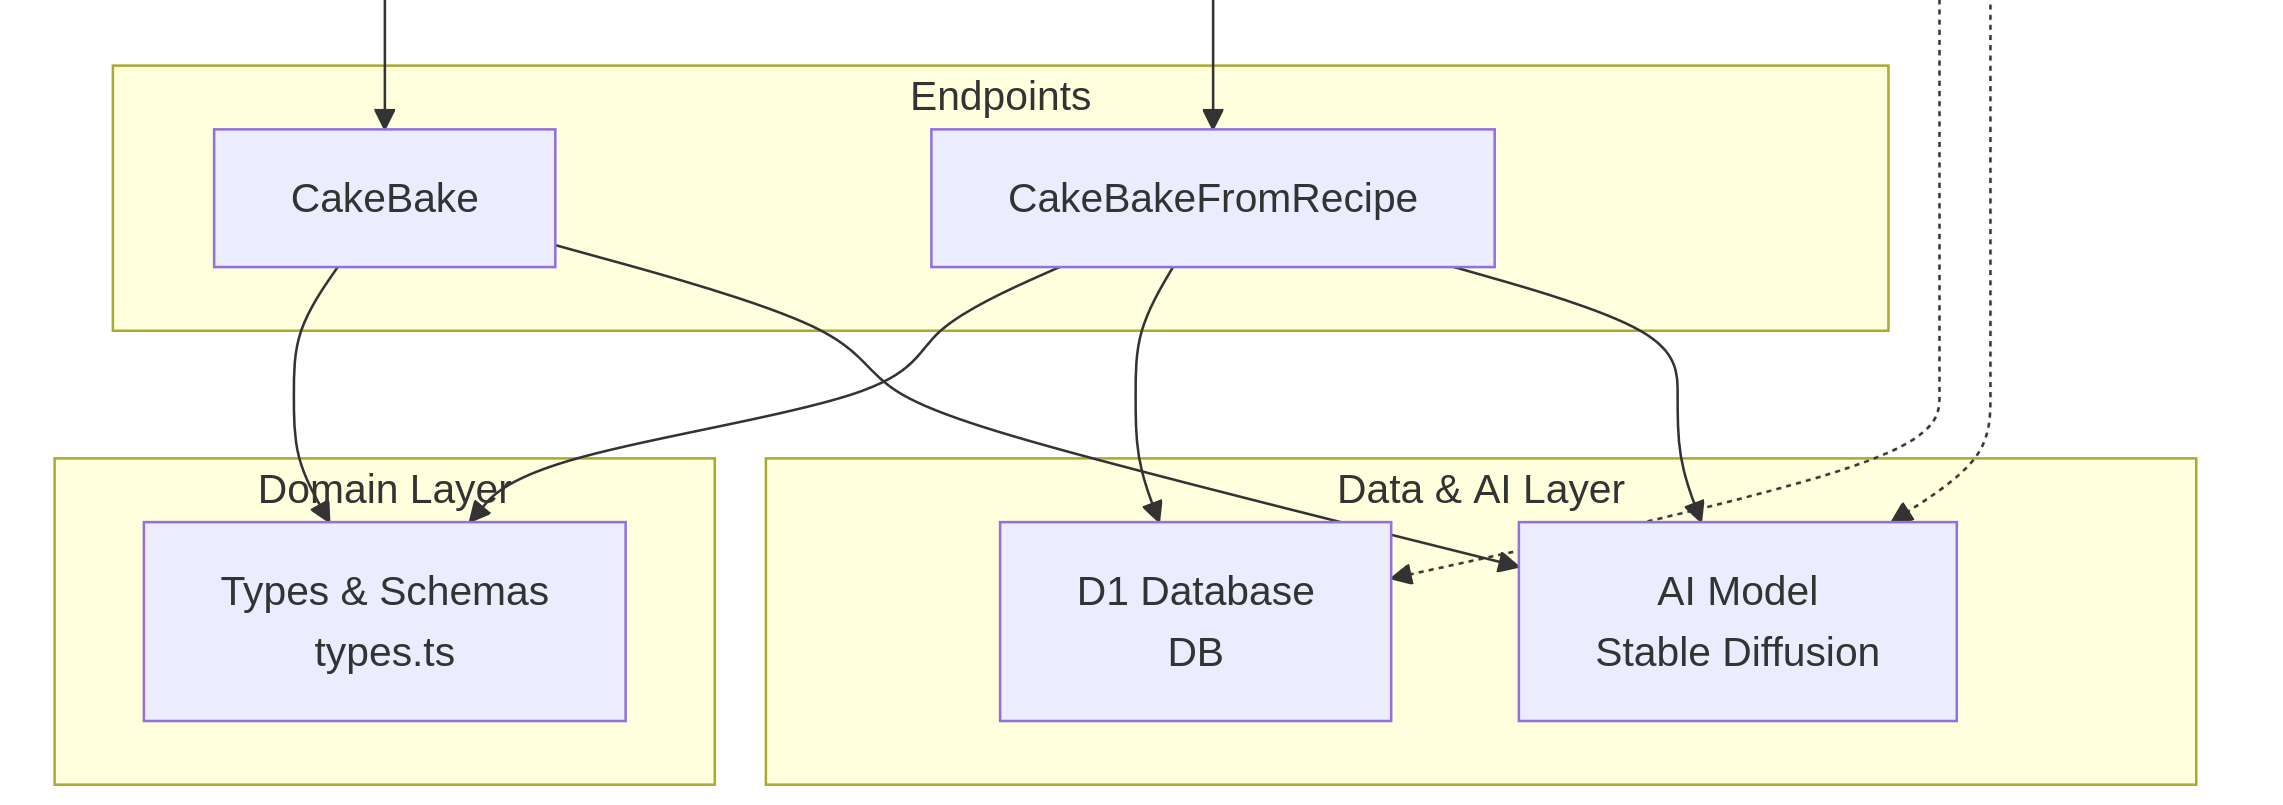
zooming in on the cake bake part of the app
Whether we call a recipe from the database or take the order on the fly, calling the AI model logic is essentially the same. First we construct the cake. Because I don't trust the customers, we make sure the bakery is creating cake jellos (and not pony's) by appending "in the form of a cake jello" to all of our descriptions for the AI prompt.
const constructed_cake = cake.description + " in the form of a cake jello";
Then we set the input prompt which we will pass into our AI call using await c.env.AI.run. And when the promise completes, we pass our response back as a jpg image.
    const inputs = {
        prompt: constructed_cake,
    };

    const response = await c.env.AI.run(
        "@cf/bytedance/stable-diffusion-xl-lightning",
        inputs
    );

    return new Response(response, {
        headers: {
            "content-type": "image/jpg",
        },
    });
OpenAPIroute handler expects a Response object, or a Promise. Our logic is blocking so it takes a minute to return the Response. Which makes sense for directly calling a generative AI and expecting a response. For better results on the client side application, we could provide a Promise and allow it to resolve on the client side. For high volume sites, adding a queue to the backend would provide an even better experience.
D1
A quick discussion on the database. We integrated a D1 database into this project. These are based on SQLite.
We defined our initial database schema in ./schemas/schema.sql.
DROP TABLE IF EXISTS cakes;
CREATE TABLE IF NOT EXISTS cakes (
  id integer PRIMARY KEY AUTOINCREMENT,
  name text NOT NULL,
  description text NOT NULL,
  state text NOT NULL
);
INSERT INTO cakes (name, description, state) VALUES ('Pastel Uno', 'Un buen pastel para el dia de los muertos', 'New');
schema.sql
Almost all of the endpoints used the D1 database with the exception of the 'ad-hoc' cakeBake endpoint. The D1 database CRUD pattern uses queries as prepared statements that are run as an async functions to fetch or update the data. For example, the cakePrep class prepares a query definition like so:
let query = 'INSERT INTO cakes (name, description, state) VALUES (?, ?, ?)';
let stmt = c.env.DB.prepare(query);
With the statement prepared we can bind parameters to each of the values in the query, run the statement asynchronously and await the response.
if (data) {
    stmt = stmt.bind(data.body.name, data.body.description, "New")
}

const result = await stmt.run();
Auth
Authentication was added at a late stage to this project. Hono and Chanfana support a number of authentication methods. In this project I added a simple bearer auth scheme. In the index.js file we had to add a few imports, update the Env type definition and add some code.
import { bearerAuth } from "hono/bearer-auth";
import { prettyJSON } from "hono/pretty-json";

...........................

type Env = {
  API_KEY: string;
};

...........................

app.use("*", prettyJSON(), logger(), async (c, next) => {
  const auth = bearerAuth({ token: c.env.API_KEY });
  return auth(c, next);
});

openapi.registry.registerComponent(
  'securitySchemes',
  'bearerAuth',
  {
    type: 'http',
    scheme: 'bearer',
    bearerFormat: 'token',
  },
)
index.ts
The app.use function takes care of adding the bearerAuth middleware to our Hono app. We get our API_KEY from environment variables. In development we can define our environment variables using the .dev.vars file. This has key/value pairs of defined variables such as API_KEY="my api key". Then the openapi.registry.registerComponent method takes care of informing the OpenAPI schema that a bearerAuth security schema is being used in this project.
In each of the endpoints we need to add security declaration to the schema so the endpoints know to include an Authorization header to each request with our token. For example in the CakeUpdate class we add the security section right after the description (although it doesn't matter which order it gets defined).
export class CakeUpdate extends OpenAPIRoute {
	schema = {
		tags: ["Orders"],
		summary: "Updates a Cake",
		description: "Updates a Cake Order by its ID",
		security: [{
			bearerAuth: []
		}],
................
cakeUpdate.ts
Deployment
Dev
Using the wrangler tool we can deploy both in dev and production. Local deployments can be done for testing as you develop just like this. This will deploy the application locally and create a locally running webserver with your app.
npx wrangler dev
Local environment variables such as your API_KEY can be defined in a local file called .dev.vars at the root. Also if you are using a database like this project you will need to deploy your database schema prior to any local development deployments. The database will also deploy locally so you won't be using any Cloudflare credits just yet.
npx wrangler d1 execute my-bakery-db --file=./schemas/schema.sql
Prod
To deploy in production to the Cloudflare network, first we need to setup our database schema again, this time adding the --remote flag.
npx wrangler d1 execute my-bakery-db --file=./schemas/schema.sql --remote
Then we deploy the app:
npx wrangler deploy
We also need to create a production api key to use for the bearer auth.
openssl rand -base64 32
## outputs a random 32 character string
npx wrangler secret put API_KEY
## copy your key value to the prompt
And that's it. The app is deployed. We can try it out at the link that is provided by the deploy command
Final word
This was a fun project to create. Cloudflare gives you a lot of great tools to create serverless workloads. If you're well versed in typescript/javascript type projects these are very easy to get started with. There was so much to create and learn with this project it took longer than I had expected, but it was all well worth it. Now we have a working Cake Jello order system for our bakery. Feel free to download the code and try it out yourself and build your own bakery. Cheers!